Don’t be put off by the pint-sized space you’ve got on your apartment balcony: there’s still room to grow.
If you are anything like me, once the sakura buds begin to swell, it’s official: I have spring fever. During this period I feel compelled to reconnect and reintroduce nature into my balcony and apartment.
During my spring cleaning I come across a plethora of empty pots and half-used bags of soil, all remnants of last spring’s overzealous buying sprees. I figure I can’t be the only one with this problem, seeing that most of us want more green in our lives and are restricted by the limited space of our balcony. For many of us, the dream of having a lushly planted oasis for a balcony is soon blocked out by drying garments, but with a little planning you should be able to do both. Try these three ideas on for size:
An Edible Garden
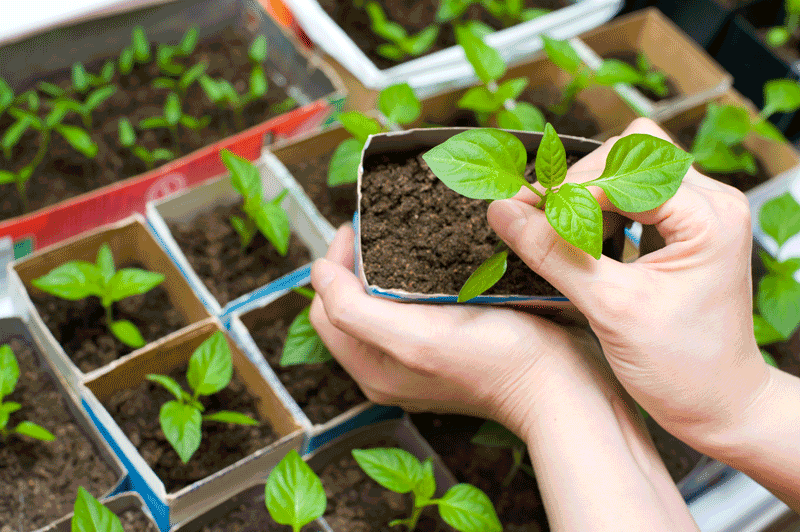
Who doesn’t like fresh veggies? I know, I can hear you saying it already: “I don’t have enough room to grow anything.” This is understandable, for the majority of us might be thinking back to the way that we or our parents grew vegetables back home. Plants were laid out in long rows with space to walk between, in turn using a lot of real estate. Over the last five years or so, Square Foot Gardening (SFG) has gained popularity as one possible solution to address the difficulties of growing in an urban landscape. It’s a growing method that increases production and uses less space at the same time.
The basic principle is to divide your planting bed or containers into 1 x 1 foot (30 x 30 cm) squares and grow different plants in each of these squares. The “secret” that makes for the increased productivity has to do with the fact that you are planting using the “space after thinning” that is recommended on the back of the seed package, ignoring the “seed spacing” advice. What does this look like? Imagine you have a 2 x 2 foot (61 x 61 cm) container or 4 square feet (0.35 sq m) to play with. In 1 square you could plant 16 carrots or radishes, in another square 9 bunches of spinach, in another 4 lettuce or basil plants, and in the final square, 1 tomato plant.
The spacing the plant needs to grow will obviously dictate how many you can put in a square. If the plant requires 3 inches (7.6 cm) of spacing then you can have 16 plants, and 4 inches (10.1 cm) of spacing then 9 plants, and so on. Once you have your containers prepared, you can use string to mark out your squares, but anything will work. Then you are off and growing! The rest is easy; once a square is done producing, you pull the plant(s) out, mix in a little fresh compost and plant something new in its place. Just be warned: your friends may soon catch wind of your green thumb and come knocking on your door for your fresh salsa.
For more information on SFG, squarefootgardening.org is a great resource.
A Green Curtain
This is a great option for those who want to improve their view and also keep cool in summer. A lot of gardens in Japan use shakkei (borrowed scenery), a technique of incorporating a background into the garden itself, but let’s face it, most of us don’t want to bring the views we can see from our balconies into our apartments. I’m trying hard enough to keep the guy who’s smoking on the balcony across from me from watching TV with me! Green curtains work double duty, providing a creative way to screen out unsightly views and also bring the refreshing sights and benefits of nature into your apartment.
Many plants lend themselves to this type of growing arrangement, but two foolproof plants to start with are goya and morning glory. Morning glory comes in a wide range of varieties, and they were a very popular plant during the Edo period in Tokyo, and continue to be sold at flower festivals throughout the city to this day. No matter what you choose to grow as a green curtain, you will be blocking out the strong summer sunlight, helping to reduce the need for air conditioning — if not in reality, then at least psychologically.
The items needed and actual setup for a green curtain are pretty straightforward and simple. Purchase a few windowsill-type rectangular containers, fill them with potting mix and plant your seeds, or just plug your plants in them. Next you will need to have a structure or string for the plants to climb up. I tend to buy a big ball of string and fashion my own tressal for the plants to climb up. All these supplies can be found at any DIY store. Tokyo is a great city to see some pretty impressive green curtains, so head out and get some inspiration.
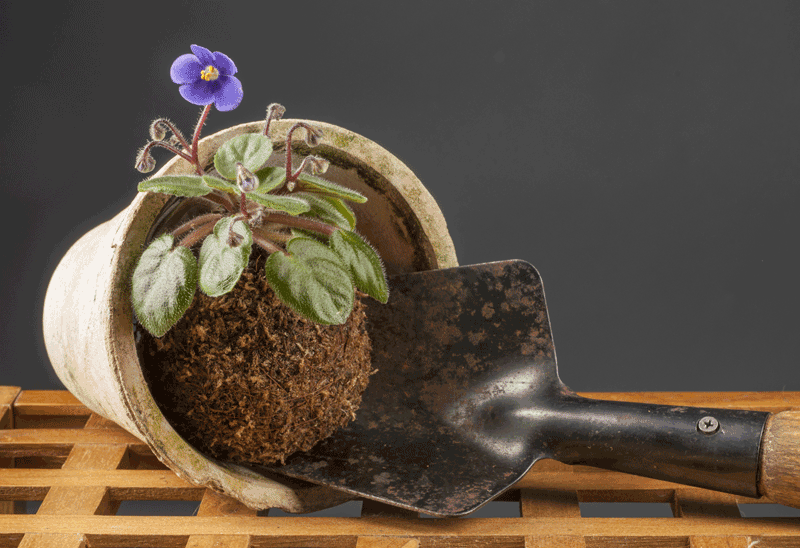
Kokedama
As much as I’d like to spend more time outdoors, I unfortunately spend a lot of my time indoors. Which brings me to my final suggestion: kokedama (moss balls) provide a great way to incorporate nature into our apartments in a way that feels very modern. If you are not familiar with kokedama, it is a plant of almost any variety that grows from a sphere of peat and soil covered in moss.
The great thing about this kind of plant is that you can grow dozens on a balcony and rotate them in and out of your apartment depending on your mood, whether the plant is in bloom or in its autumn glory, or whether you are having people over.
Kokedama have become very popular both in and out of Japan in the past few years and can be purchased anywhere from department stores to local “home centers” across Tokyo. But we recommend making your own, as half the fun is in creating them. One excellent online resource for making kokedama is art-kokedama.com.
You can use almost any plant or tree you fancy. Aloe, Japanese maple, succulents, English ivy — the possibilities are only limited by your imagination. Also, you can really give your inner designer free rein with regards to showing off these moss spheres; you get to decide how they will be displayed because they don’t have pots. Anything from a small antique plate to a silver dish can be used. The possibilities are endless.
To make a kokedama you will need:
– A plant
– Sphagnum moss
– Akadama (a type of clay used for bonsai)
– Peat moss or a peat based soil mix
– Fishing line/nylon string
– Moss (you can collect)
Steps to make a kokedama:
1. Take the plant out from its container and gently remove all of the soil surrounding its roots.
2. Wrap the plant’s exposed roots in damp sphagnum moss.
3. In a bowl, mix 70% peat with 30% akadama. Add some water and mix together. The goal is to be able to form a clay ball about the size of an apple.
4. Create a hole in the ball with your thumb and gently push the plant’s sphagnum moss-covered roots inside. Remold the sphere, making sure all of the roots are enclosed inside the clay.
5. Cover the outside of the ball with moss. Once covered, wrap the ball with the nylon string to keep the moss in place.
As the days slowly get warmer and nature starts to give us signs of its rebirth, use this time to rethink your balcony’s role. Elevate it from its lowly status as strictly a place to dry your clothes! Allow your balcony to be an extension of nature. Get your hands dirty and let’s blur the line between inside and out.
Greg Afman is the former lead horticulturist for one of the most prominent Japanese gardens in the US. He is now living and working as a gardener in the Nagoya area.
Updated On April 26, 2021